
A couple of days ago, I was once more “nicely reminded” by my wife, that I still had to throw away my current plastic sprues and trash. This made me thinking. First of all, how can I get around this extremly exhausting task and secondly, isn’t there something better to do with it?
Beside that, I was also thinking about easy ways to build purity seals and parchments on my own and than it struck me. So today I will show you, how to build your own purity seals out of old plastic sprues … with few more than a candle 😉
What you need
- 1 Candle / Tealight and a lighter
- 1 Pincer
- 1 Sharp knife
- Plastic Glue
- Plastic Sprues
Step 1 – Preparing the Parchments
First, you simply cut out some straight stripes in the length you prefer. In general, I would make them 1-2mm longer, since we’re going to bend them a little. For the width, it’s the same, it’s simply your choice. Start with bigger seals and when you got the hang of it, get smaller.
Next, take a stripe with the pincer, right at the end of one side and lit the candle. Now it’s time to be quick. Hold the stripe close to the flame, but not into it. When you take too long, it might catch fire, but just blow it out and don’t worry too much.
Right after heating it, the plastic can be formed for a very short moment. Be quick and move it with your fingers, just one direction at a time. If you’re not happy yet, heat the same part again and move on, just until its right. Then wait some seconds, grab the other side of the stripe and do the same. You can also twist the plastic in this progress, just try a little bit.
Tip 1: You can also bend the plastic before heating it. As you know, plastic gets weak while forming it (and white at that spot), but don’t worry as long as you don’t break it. After bending it, hold it right next to the flame and the edges will melt, harden and get pretty sturdy in the end. But again, be quick at it.
Tip 2: Cut some triangles from the edges of the stripe before melting them. Be carful not to melt those gaps together again, but this way you give the seals a more torn look.

Step 2 – Preparing the Seals
For the wax seals, we simply cut out some slices from the sprues. Especially the sprues from Dreamforge have some cylindrical parts you can use for that. Take these round slices with your pincer again, and have the blunt side of your knife ready.
Now, heat the slice and quickly press your knife gently against it, pressing against the soft plastic and forming it. Repeat that 2 or 3 times all around the slice and you will get the impression of a stamp being pressed right in the middle.

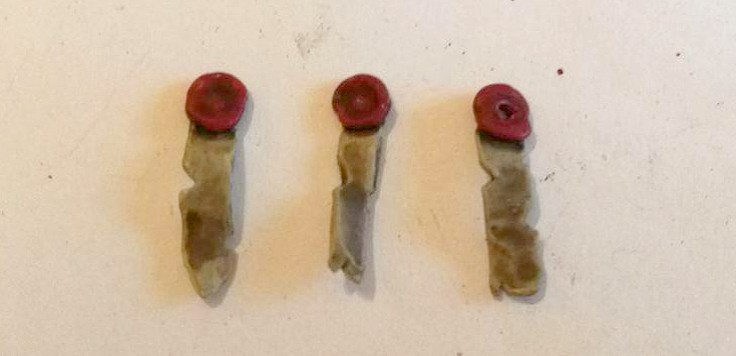
Step 3 – Bring it together and paint it
Now that we have both parts of the seal ready, we have to glue them together. If they don’t fit yet, cut the parchment a litte thinner at one end and voilà, the seal is ready to paint.
The colours are totally up to you, but to get a better result I would recommend the follwing two methods.
- When using a wash for the parchments, apply a second layer on the areas in the “background”, the recesses. It will make them darker and therfore strengthen the curved look.
- When painting the wax, add a lighter color just to the borders and a maybe a spot of colour right in the middle of the seal. This will strengthen the look of a seal-stamp or ring pressed into the wax.
By the way, these seals are a great addition to your own Sisters of Battle Plastic Conversions, saving you around 0,25€ per Model for only a couple of minutes extra-work! I will definitely try to make some really long seals, wrapped around a Sisters foot. Celestine-Style incoming …
Hope you enjoyed this little “tutorial” and perhaps you try it yourself. For further ideas, feel free to comment! And if needed, I can include some additional photos or perhaps a video.
And when you’re afraid of burning your fingertips, always remember: The Emperor protects!
